Aqara Hub M3 Review: Is There Anything This Little Box Can't Do?
It does so much besides, but the main reason to buy the Aqara Hub M3 is to add Matter control to existing Aqara products.
Please note: This page may contain affiliate links. Read our ethics policy
The Aqara Hub M3 is not your average smart home hub. It’s Matter-enabled, both as a controller, Thread Border Router, and a bridge—letting it play nicely with other Matter controllers in your home like Apple HomeKit and Google Home. It’s a pretty nifty device on its own, though, with a basic speaker for alarm sounds, Ethernet connectivity with Power over Ethernet support, and even the ability to learn and control infrared devices.
Aqara is a pioneer when it comes to Matter support for their vast array of smart home products, and have gone all in on bringing their existing extensive Zigbee product line into the Matter ecosystem (what is Zigbee, and is it better than Matter?) That's the first huge role the Aqara Hub M3 can perform for you: bridging existing Zigbee sensors and devices over to your Matter network, so you don’t need to upgrade just to get Matter compatibility. And it’s not just Aqara-branded sensors either; although it’s a more limited list, the Hub M3 can actually bridge some other manufacturers Zigbee sensors too.

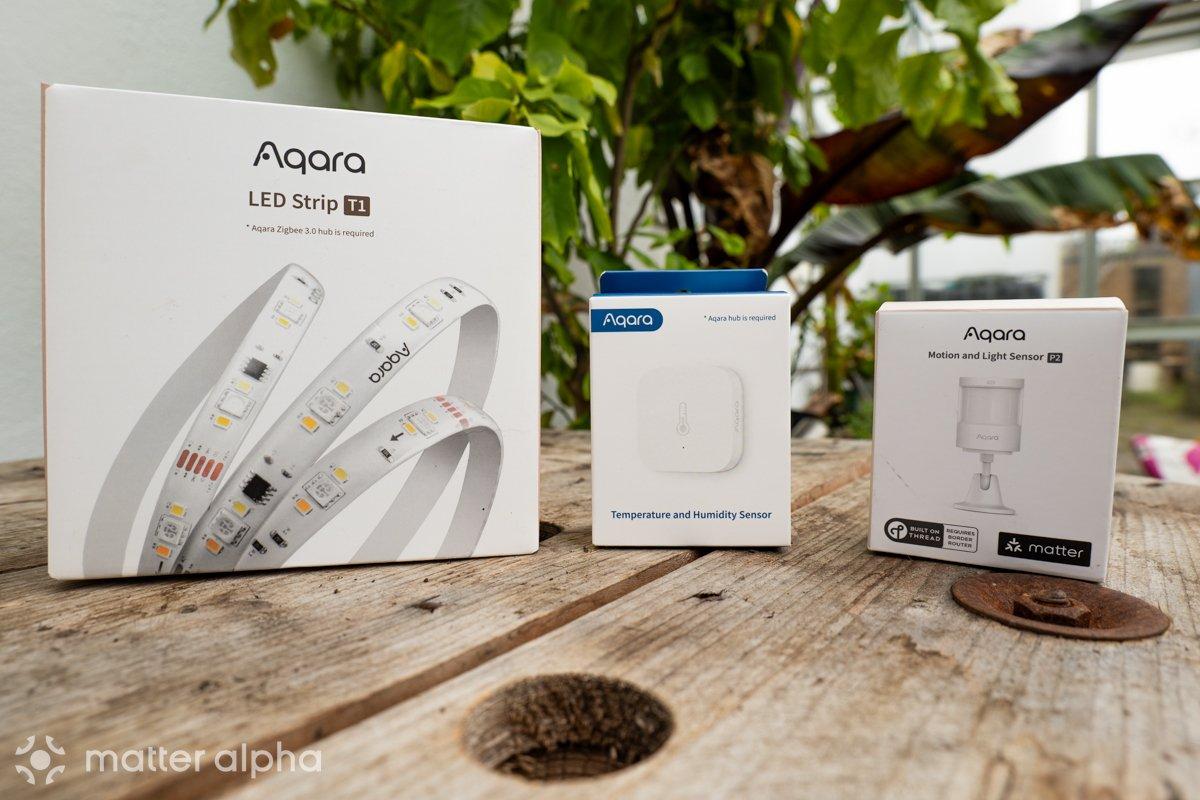
Although we're strictly a Matter smart home site, in order to check out the bridging capabilities, we were also sent a Temperature and Humidity Sensor, and a T1 LED strip—neither of which are natively Matter-compatible. Both require a Zigbee 3.0 hub to work. The T1 LED strip is two meters of RGBWW (color and white) LEDs, which is great for lighting small areas or providing discreet notifications.
In addition, I’m pairing the Hub M3 with the new Aqara P2 Motion and Light sensor and the P2 Door and Window sensor, both of which run on Matter over Thread.
Aqara M3 Hub Design
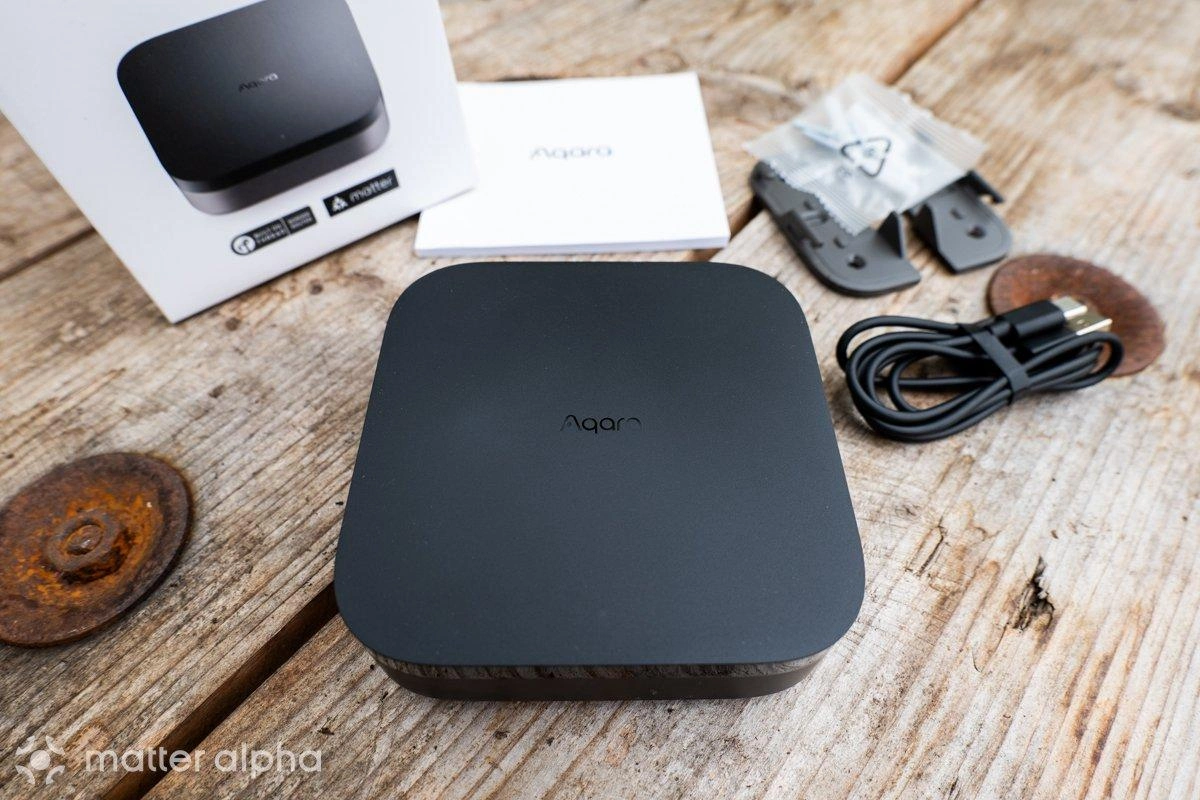
Inside the Hub M3 box, you’ll find the Hub itself, a mounting plate, and some screws, as well as a USB-C power cable. No power adaptor is provided, and you’ll need at least 5V 2A.
The device itself is compact, but no more than you’d expect from a hub. It's roughly 10cm square and 3.7cm deep (4.13 x 1.44 inches), and weighs 330g. That’s surprisingly heavy, so you can't just use a 3M sticky pad to mount it. You will need to screw in the provided mount plate or just leave it flat on a table. The USB-C and Ethernet port are inlaid on the back for flush mounting.
First-Time Setup
When you power on for the first time, you’ll hear “Ready to connect, please open the Aqara Home app.”
If this is your first time opening the app, you'll greeted by a slew of permission requests: Bluetooth, your home data, etc. Click Add Accessory in the top right to automatically detect the Bluetooth signal from the M3 Hub. You'll also need to scan a QR code to verify; be careful, as there as two affixed to the back of the device. Use your thumb to cover up the Matter code and ensure you only scan the Aqara one, otherwise you'll get an error.
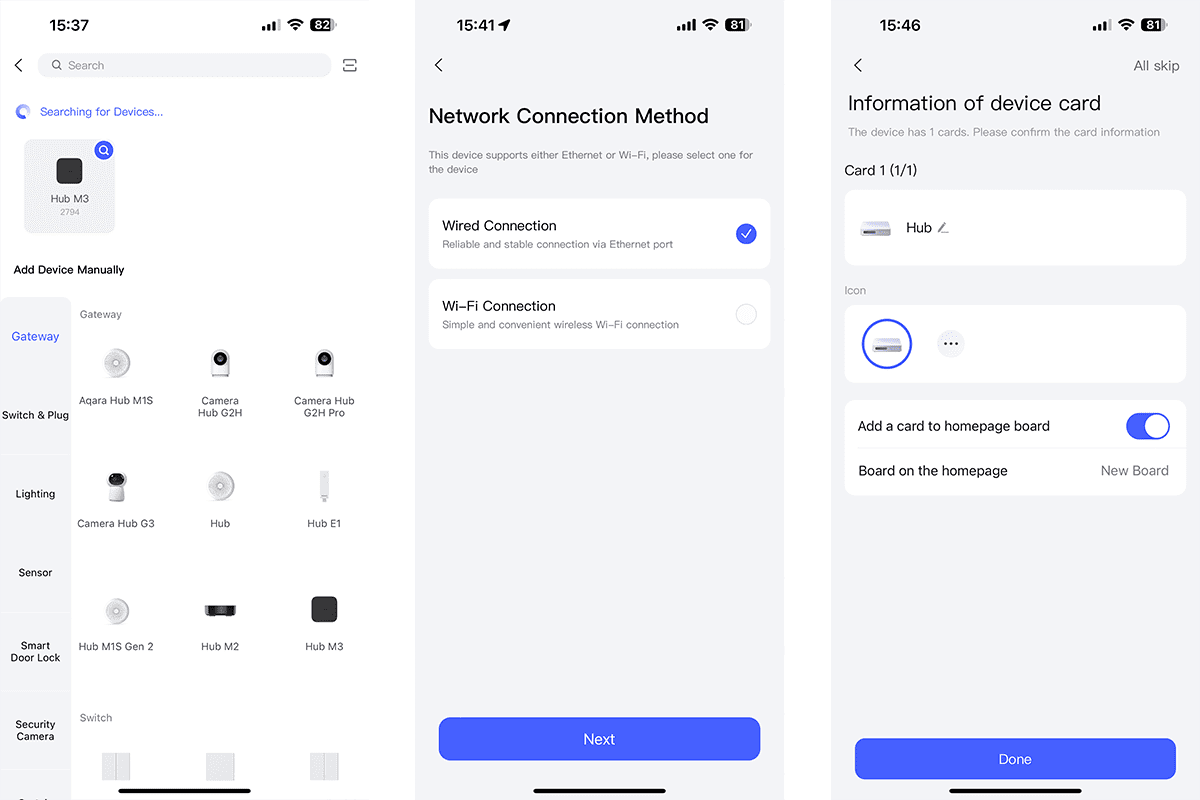
Next, select Wi-Fi or Ethernet connection. One pitfall here is that if you suddenly decide to use Ethernet and you didn't already plug it in, you'll find the USB cable gets in the way, so you'll need to pull the power and restart the process. Wi-Fi is an option, but one of the few rules I live by is that if it has an Ethernet port, it should be plugged in. Keep the airwaves clear for devices that don't have the luxury. You're potentially going to get a faster response time, too.
Interestingly, if you have PoE or Power over Ethernet infrastructure in your home network, you can ditch the USB-C cable and just power the whole thing on Ethernet alone. Brilliant.
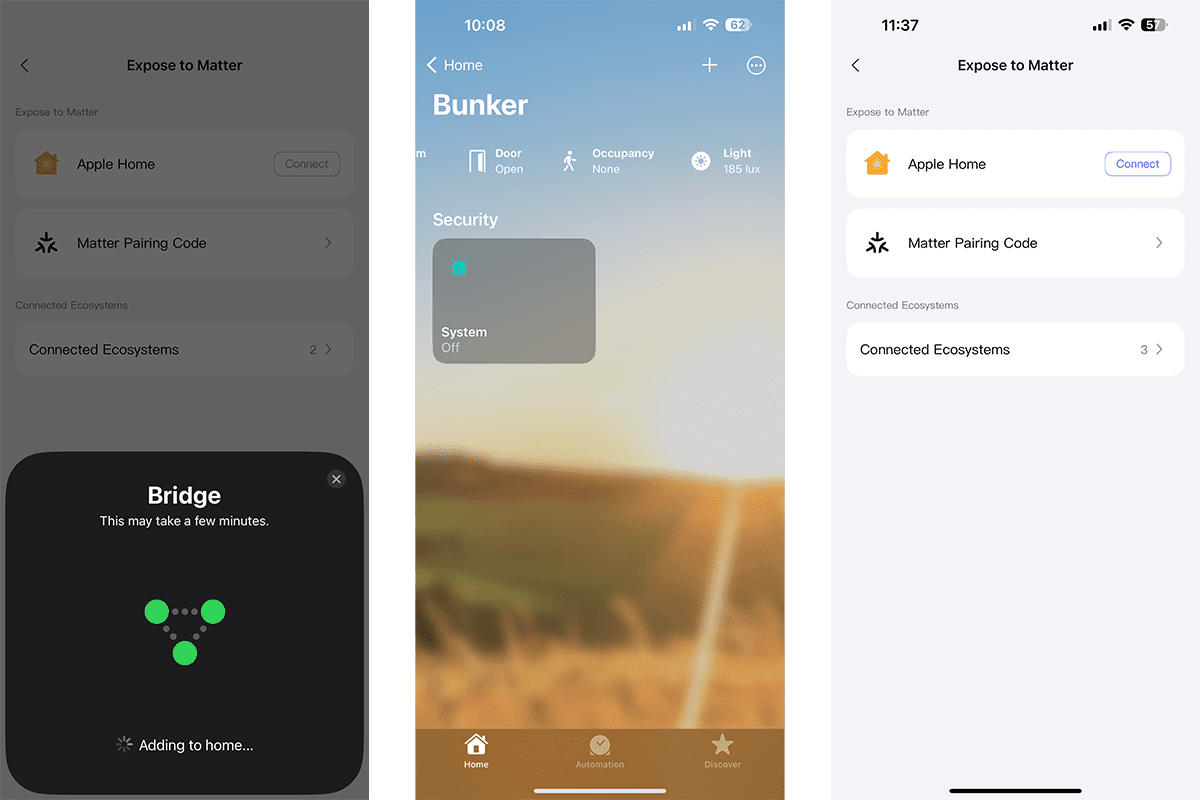
You'll run through a few more config options like Dashboard styles, but unless you know what you're doing, I'd suggest accepting the defaults. As a last step, I'd suggest going into the settings -> Expose to Matter -> Connect to Apple Home. This creates your bridge device, and the security status (Off, Home, Away).
Then you're ready to start adding sub or child devices: the sensors and devices your hub will control. I started with the P2 Door and Window sensor I reviewed before; previously paired with Apple HomeKit directly. I deleted it from HomeKit, though that isn't strictly necessary; I could have re-exported the Matter pairing code from HomeKit, but I wanted a fresh start directly to the Aqara Hub. Entering pairing mode from the sensor itself is simple: hold down the button for a few seconds. Since it wasn't automatically detected, I had to select from the list, then type in the Matter pairing code written on the side.
The P2 Motion and Light sensor was equally simple to add over Matter; again just a case of holding down the pairing button.
Next, I added the Zigbee Temperature and Humidity sensor (technically, it has an atmospheric pressure sensor, too, but that's not a HomeKit-compatible data point, so you'll only get that in the Aqara app). This was added seamlessly to the Aqara Home app, but since the sensor lacks the "Expose to Matter" setting, it wasn't obvious to me how I go about adding that to HomeKit. As it turns out, it was already there; Zigbee devices are automatically bridged (if you set up the Hub as a bridge already).
Adding the T1 Lighting strip was also easy; although not automatically detected, you just find it in the list of devices, and then the Hub voice prompts when it's been added. If it's not already in pairing mode, follow the onscreen instructions to hold the power button for five seconds. Be patient though, as I found a little lag between the Hub itself voice prompting that the LED strip had been successfully added, and the on-screen reset instructions disappearing.
Now, here’s where some of the customization features shine. When adding the strip to your dashboard, you can choose the amount of control that you want. You can have a basic dimmer-style card, a few more expansive one, such as power, brightness, and a full palette of colors.
Or you can jump into automation if you dont even want to control it manually.
Automation: A Learning Curve
The Aqara Hub itself provides an extensive set of automation capabilities, but there's a learning curve mainly because of some language quirks.
One thing I ran into pretty quickly was the difference between blue and green actions. On the door sensor, for instance, you have two different time-based events for the door sensor to use in the IF or trigger section of a new automation: one that says "is open for" (with a green dot) and one that says "is open exceeding" (with a blue dot).
They are the same thing, but you should know that a green action is a one-off trigger event sent by the sensor, while blue is the current status which the Hub can request from the sensor. You can combine these from different sensors, but you must have one and only one green item to trigger the automation, and zero or more blue status checks. You can't only use blue (because the system would have to be constantly polling sensors to get their current status), and can’t have more than one green (because they’re one-off events that don’t occur together).
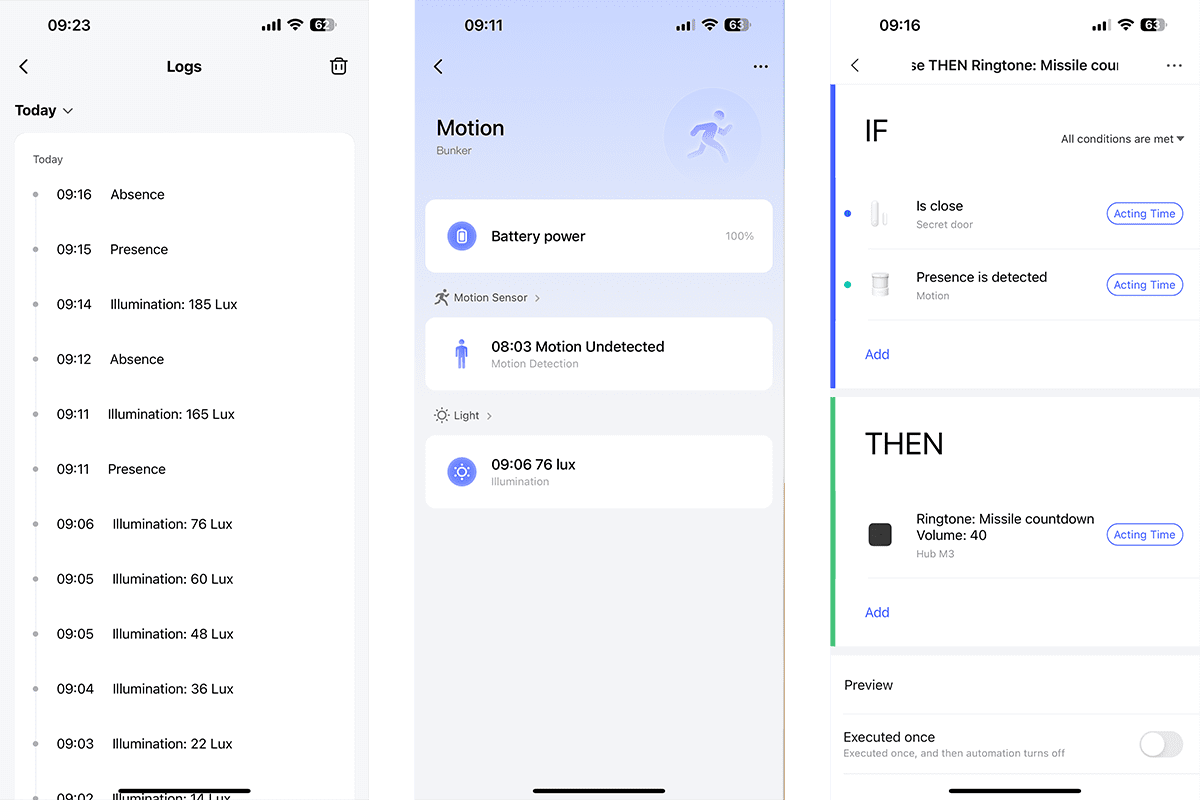
In the example above, my alarm triggers when presence is detected by the motion sensor, but it also checks to see if the door is closed.
Once I understood that fundamental concept, it was really easy to make some fun and useful automations. Since I test a lot of smart home gear, I decided to put everything Aqara down in bunker, and here’s what I came up with in a few minutes:
- If someone enters the utility room while the bunker door is closed, the presence sensor will detect you and start playing the included missile alert sound. You can even upload custom MP3s to the Hub. I have a separate electronic lock on the bunker door, but that's outside of smart home control for security reasons.
- Once the bunker door is opened and the illumination level is below 10 lux (it's probably nighttime), the T1 LED strip plays a custom scene: a pulsating red.
- If the door is closed (and stays closed) for one minute, the strip turns off.
I also added a simple notification using the temperature and humidity sensor; at over 80%, I'll get an alert to turn on the dehumidifier.
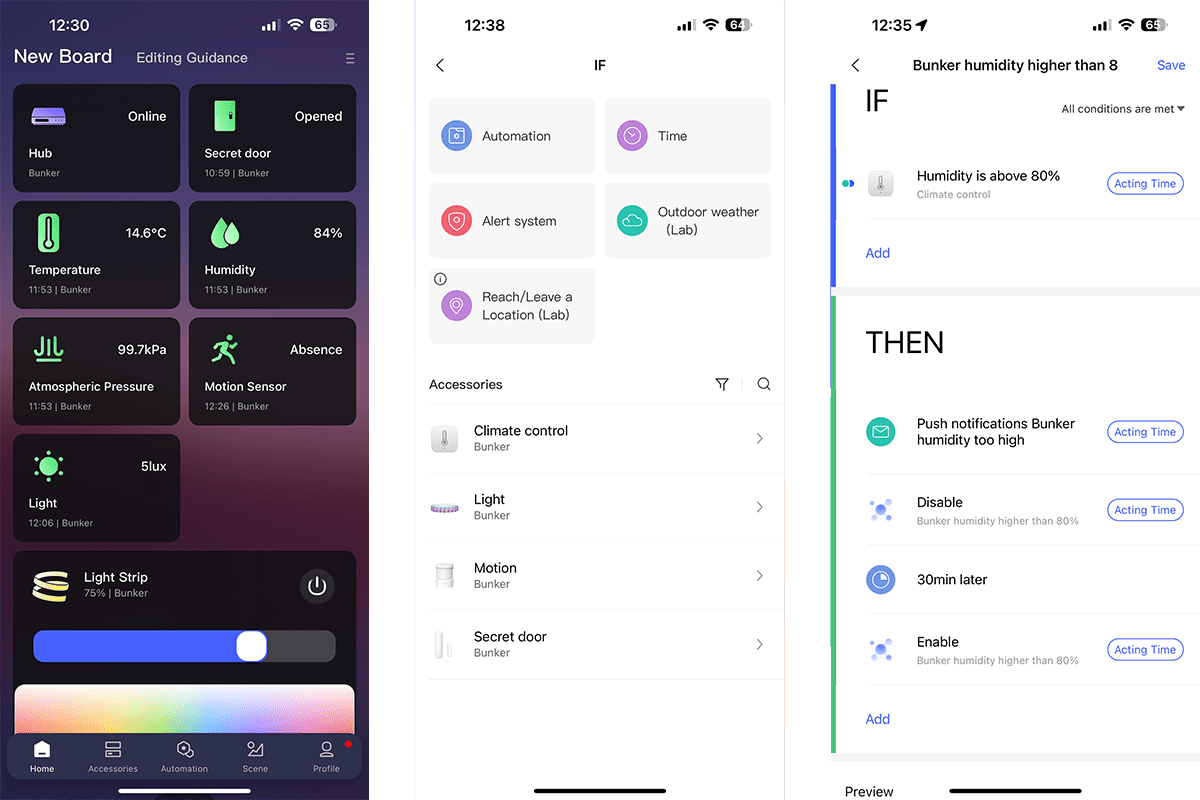
That's only scratching the surface, though. One avenue I have yet to explore fully is automating the automations; one automation can enable or disable another. At a basic level, this solves the problem of having a sensor notify repeatedly. The humidity alarm sends a notification, disables itself, waits ten minutes, and then re-activates.
My impressions of automation with the Hub M3 are that it's a little confusing to pick up, but once I got used to it, it felt much more powerful than other systems like Apple Home.
The Aqara Hub M3 Is an Essential Purchase for Aqara Users
For anyone with an existing smart home setup using Zigbee sensors from Aqara, the Hub M3 is an essential purchase. If you’ve added your Hub M3 as a Matter bridge, once added to your Hub, your Zigbee devices are automatically bridged over to your Matter environment seamlessly. It's a breath of fresh air for anyone who’s dabbled in smart home ecosystems.
Matter over Thread accessories, such as the light or door sensor, aren't automatically synced, but you can manually follow the Matter device export procedure to get those added smoothly, or just click Connect to Apple Home.
The Aqara Home app is well-designed and customizable, while the automation offers some powerful capabilities. Sure, it has a bit of learning curve and a few language issues—but you quickly pick that up.
I'm thoroughly impressed by my experience of the Aqara Hub M3 so far. If you've been disappointed by the lack of dedicated hubs from the likes of Apple (I really did not want to put a HomePod Mini in my home; it doesn't even support Spotify), and want to try something different while maintaining your existing system and sharing sensor data—the Hub M3 is a brilliant choice. After a horrible few years with a competing system that starts with Smart and ends in Things, I think Aqara might have reignited my passion to actually automate my home again.
About the Author

James Bruce
Smart Home Contributor, Videographer, and Developer
James spent seven years in Japan, where he brought technology into the classroom as a teacher and worked part-time as a data centre engineer. Formerly the CTO and Reviews Editor of MakeUseOf, he has also contributed to publications like TrustedReviews, WindowsReport, and MacObserver. With a BSc in Artificial Intelligence, James combines his technical expertise with a passion for writing, programming, and tech reviews. Now based in Cornwall, he enjoys the slower pace of rural life, building LEGO, playing board games, and diving into VR.

Aqara Door and Window Sensor P2
The Aqara Door and Window Sensor P2, a contact sensor, is a key component of the Aqara smart home ecosystem, offering compatibility with the Matter protocol, enabling seamless integration and control within your smart home network.
Aqara Motion and Light Sensor P2
The Aqara Motion and Light Sensor P2, part number AS057, is a unique component of the Aqara smart home ecosystem, offering compatibility with the Matter protocol, and providing seamless integration with popular virtual assistants for enhanced home automation.
Aqara Hub M3
The Aqara Hub M3 is a Matter-compatible gateway that connects and manages up to 128 smart devices, facilitating local device automation without relying on Wi-Fi.