Apple Puts Swift on Cheap ESP32 Boards—And Shows How to Make DIY Matter Accessories
Now you can make a DIY Matter accessory... in Swift!
Please note: This page may contain affiliate links. Read our ethics policy
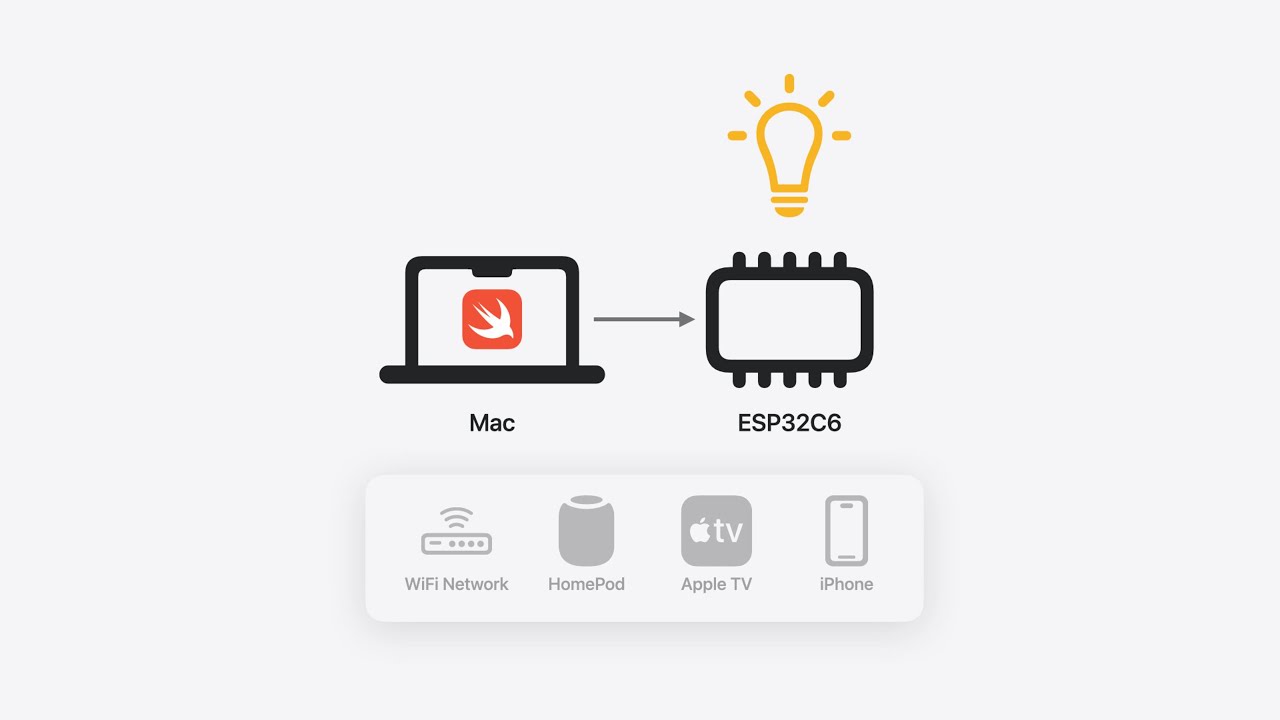
At WWDC24, Apple announced that Swift can now be used on embedded devices; that means it can run on small microcontroller development boards, like a $5 ESP32. Although this isn’t the first time we’ve seen DIY Matter accessories, it promises to bring more Swift programmers to the world of Matter, and create an easier entry point to DIY Matter accessories if you don’t want to program in C++.
At least... the programming might be easier, but getting the toolchains set up certainly isn't.
What is Swift?
Swift is a powerful multi-platform C-like programming language developed by Apple, but now fully open-sourced. Released over a decade ago and having rapidly gained popularity, it’s now a well-developed language with all of the modern features you'd expect. If you have zero experience with Swift, you can dip your toes in with Swift Playgrounds, a fun way to explore and learn the basics of the language. Learning Swift also means you’re well on your way to coding iOS and Mac apps, with the language having largely replaced Objective-C for all Apple development.

Getting Started With Matter on ESP32 and Swift
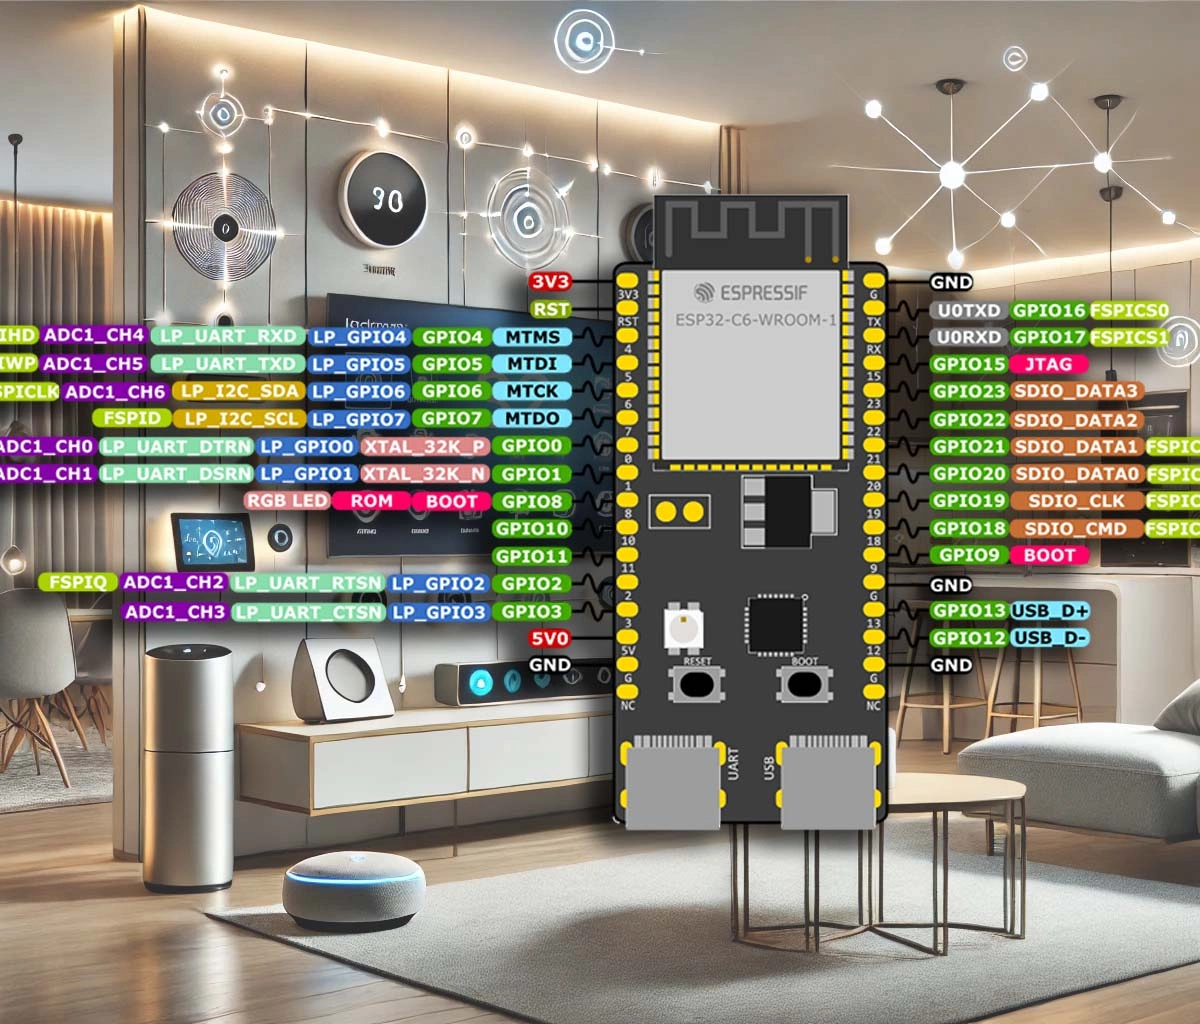
The ESP32-C6 is a low-cost development board (similar to an Arduino, if you’ve heard of that) that incorporates Wi-Fi, Bluetooth, Zigbee, and Thread. If you want to have a go at making your own Matter accessories with Swift, make sure you get the N8 version of the board, as there are a lot of ESP32 boards around.
(Image from Adafruit)

Follow the full tutorial at Apple’s Github page closely, as it’s a fairly complex install. Also, ensure you’re not on a limited data plan; it’s about 100GB of downloads in total if you don’t already have Xcode and Docker.
To summarise some of the steps and requirements:
- Install Xcode
- Install Swift 6.0 Development version (the nightly versions are needed as the main branch doesn’t yet have embedded Swift support)
- Select which version of Swift to use with EXPORT (you'll need to do this every time you restart)
- Install HomeBrew
- Use Homebrew to install cmake, ninja, and dfu-util
- Download the ESP-IDF package, and build it.
- Download the ESP-Matter package, and build that.
- Setup your shell to use the new Swift Toolchain
- Export the ESP-IDF and ESP-Matter to add them to your development environment
If you’re unable to get the correct version of Swift to be used, make sure you run:
export TOOLCHAINS=org.swift.600202406181a
...or whatever identifier you found for Swift 6—the above is correct for the 16th June nightly release.
Docker
After that, you’ll swap over to Docker (yes, you need Docker installed too):
- Download the Swift Matter example codes (finally, we're getting somewhere!)
- Build the Docker image
- Install esp tool (which you’ll use to flash the board)
- Run the Serial server to connect your board to Docker
- Launch the Docker container
- Compile the demo
- Profit?
If this seems a little long-winded, that’s because it is. It would be optimistic to set aside a few hours. There are plenty of opportunities to go wrong, but if you have a cup of tea and follow the tutorial closely, it should all work out. If you get random errors during the Docker build (as I did), I found it was because I was running out of memory—try shutting down other containers or allocating more resources in Docker settings.
Once you've built and understood the LED smart light, you can try some of the other supported smart device types, and connect various sensors to the ESP32 data pins.
As mentioned, this isn't the only DIY Matter project. For broader compatibility with Wi-Fi-only ESP32 boards (and a much less complicated installation), try the Arduino ESP32 Matter project. We'll have a full tutorial for that coming soon.
About the Author

James Bruce
Smart Home Contributor, Videographer, and Developer
James spent seven years in Japan, where he brought technology into the classroom as a teacher and worked part-time as a data centre engineer. Formerly the CTO and Reviews Editor of MakeUseOf, he has also contributed to publications like TrustedReviews, WindowsReport, and MacObserver. With a BSc in Artificial Intelligence, James combines his technical expertise with a passion for writing, programming, and tech reviews. Now based in Cornwall, he enjoys the slower pace of rural life, building LEGO, playing board games, and diving into VR.