What is Matter.js? How to Make a Virtual Device Switch
Matter.js is a JavaScript implementation of the Matter smart home protocol, letting you create, simulate, and control devices using simple code. In this guide, I’ll show you how to build a virtual PC suspend switch to remotely put your computer to sleep.

Please note: This page may contain affiliate links. Read our ethics policy
Matter.js is a Javascript implementation of the full Matter protocol which lets you simulate, control, and interact with Matter devices—all from within the simple and familiar Javascript language (well, sort of; it's Typescript, which enforces good code standards then compiles to Javascript).
The Connectivity Standards Alliance has officially listed Matter.js as one of the approved options for building Matter-compliant devices, bridges, and controllers, and it's now at version 0.12, so let's see what we can do with it. Scroll down to find my example project: a virtual suspend switch for PC or Mac, allowing to sleep your machine if you accidentally left it on.
What Can You Do With Matter.js?
As a piece of software, Matter.js can do anything your programming skills can envision and push it into a useable Matter wrapper.
Create virtual devices
If you’re developing a Matter controller or software project, you probably want some devices to test on. But buying so much hardware can be costly and unwieldy; with Matter.js, you can spin up some virtual devices and simulate them on your home network. Emulate sensor data, use it in your automation routines, or see if your favorite smart home platform supports a particular device type.
Build a virtual bridge to real development hardware
Matter.js isn’t confined to virtual devices; you can interact with actual hardware using other Javascript libraries. For instance, you could create a virtual Matter switch that connects to a real-life servo motor that pushes an actual switch (though an off-the-shelf SwitchBot Switch would probably be better if that's actually what you want to do).
Use the Matter.js shell to interact with Matter devices
Matter.js includes an interactive shell that you can use to control your real-world or virtual Matter devices. That means you don't need to write any code, just learn the correct shell commands to interact with different devices. That includes commissioning with a Bluetooth connection.
Create actual, certified Matter devices
Matter.js is officially recognized by the CSA, so technically, you can build certifiable devices with it. However, not all of Matter.js is certified, so you'll need to reach out to the developers to confirm if the functions you want are certifiable.
How to Build a Virtual PC Suspend Switch
Matter.js is Javascript, so we’ll be using Node.js to build some software that we can run on our machine. My aim here is to create a "virtual PC switch" that I could use to suspend a machine (from bed) if I left it running accidentally. Here's what I'd like it to do:
- Run at startup and update itself to "on".
- Suspend the machine when it receives the "off" command.
- Update itself to "on" status when the machine resumes.
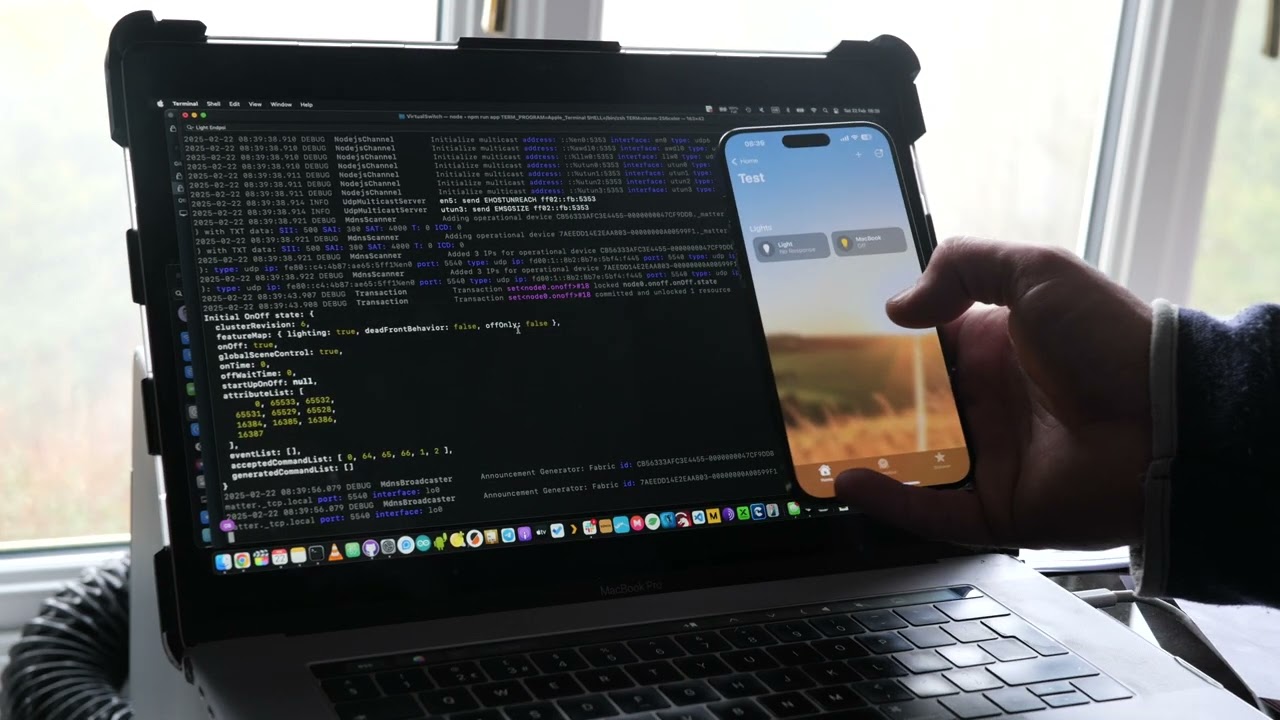
Here's the end result to show you what you're working towards:
Start by ensuring you have the latest version of Node installed; Matter.js needs at least v22. The easiest way to do is to visit Nodejs.org, and run the download script provided (just copy and paste the whole thing in your terminal):
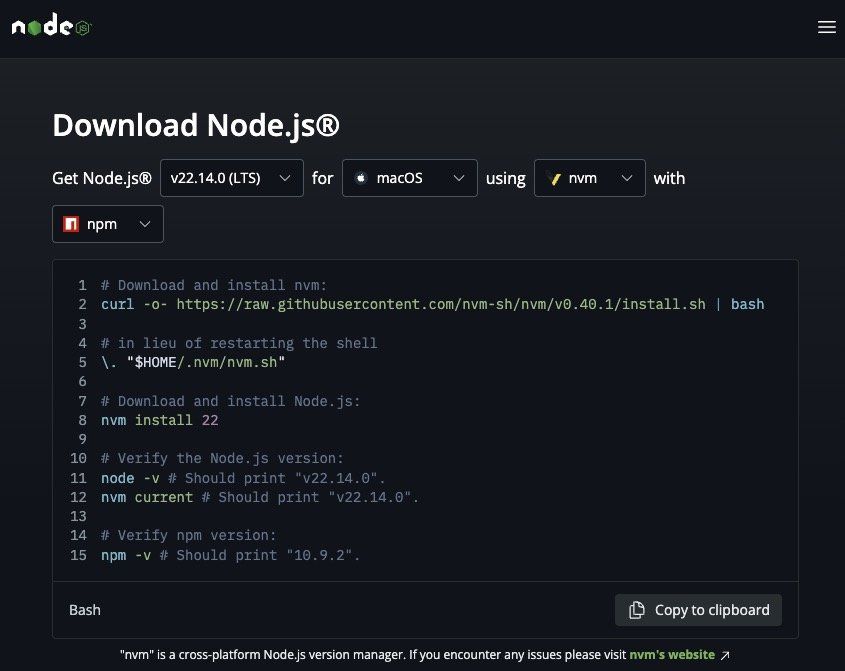
This will also install NVM, the Node Version Manager, which allows you to switch versions when needed. For Matter.js, we need version 22 (or higher). Verify by typing:
node -v
We also need to update NPM, the node package manager:
npm install -g npm@latest
Create a directory wherever you prefer, and navigate inside of it:
mkdir virtualswitch && cd virtualswitch
Now we can use the Matter.js built-in template creator with :
npm init @matter
You'll be prompted to also install "matter-create"; hit "y" to accept.
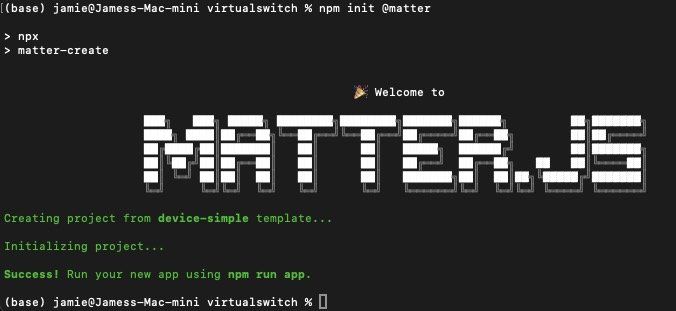
This creates a very basic on/off example from the default "device-simple" template, though there are different templates you can use if needed. To create a virtual Temperature/Humidity sensor, you would use:
npm init @matter device-sensor
As instructed, you should now be able to do:
npm run app
to run your virtual device, although it won’t actually do anything yet. We just want to ensure the basics are working for now. It should start up immediately, but you'll need to scroll up to find the pairing code. Go ahead and add a new accessory to your Matter controller of choice—you might get a warning that your device isn't officially supported; that's fine. Once you've paired it, the status will be remembered and the QR code won't be shown again.
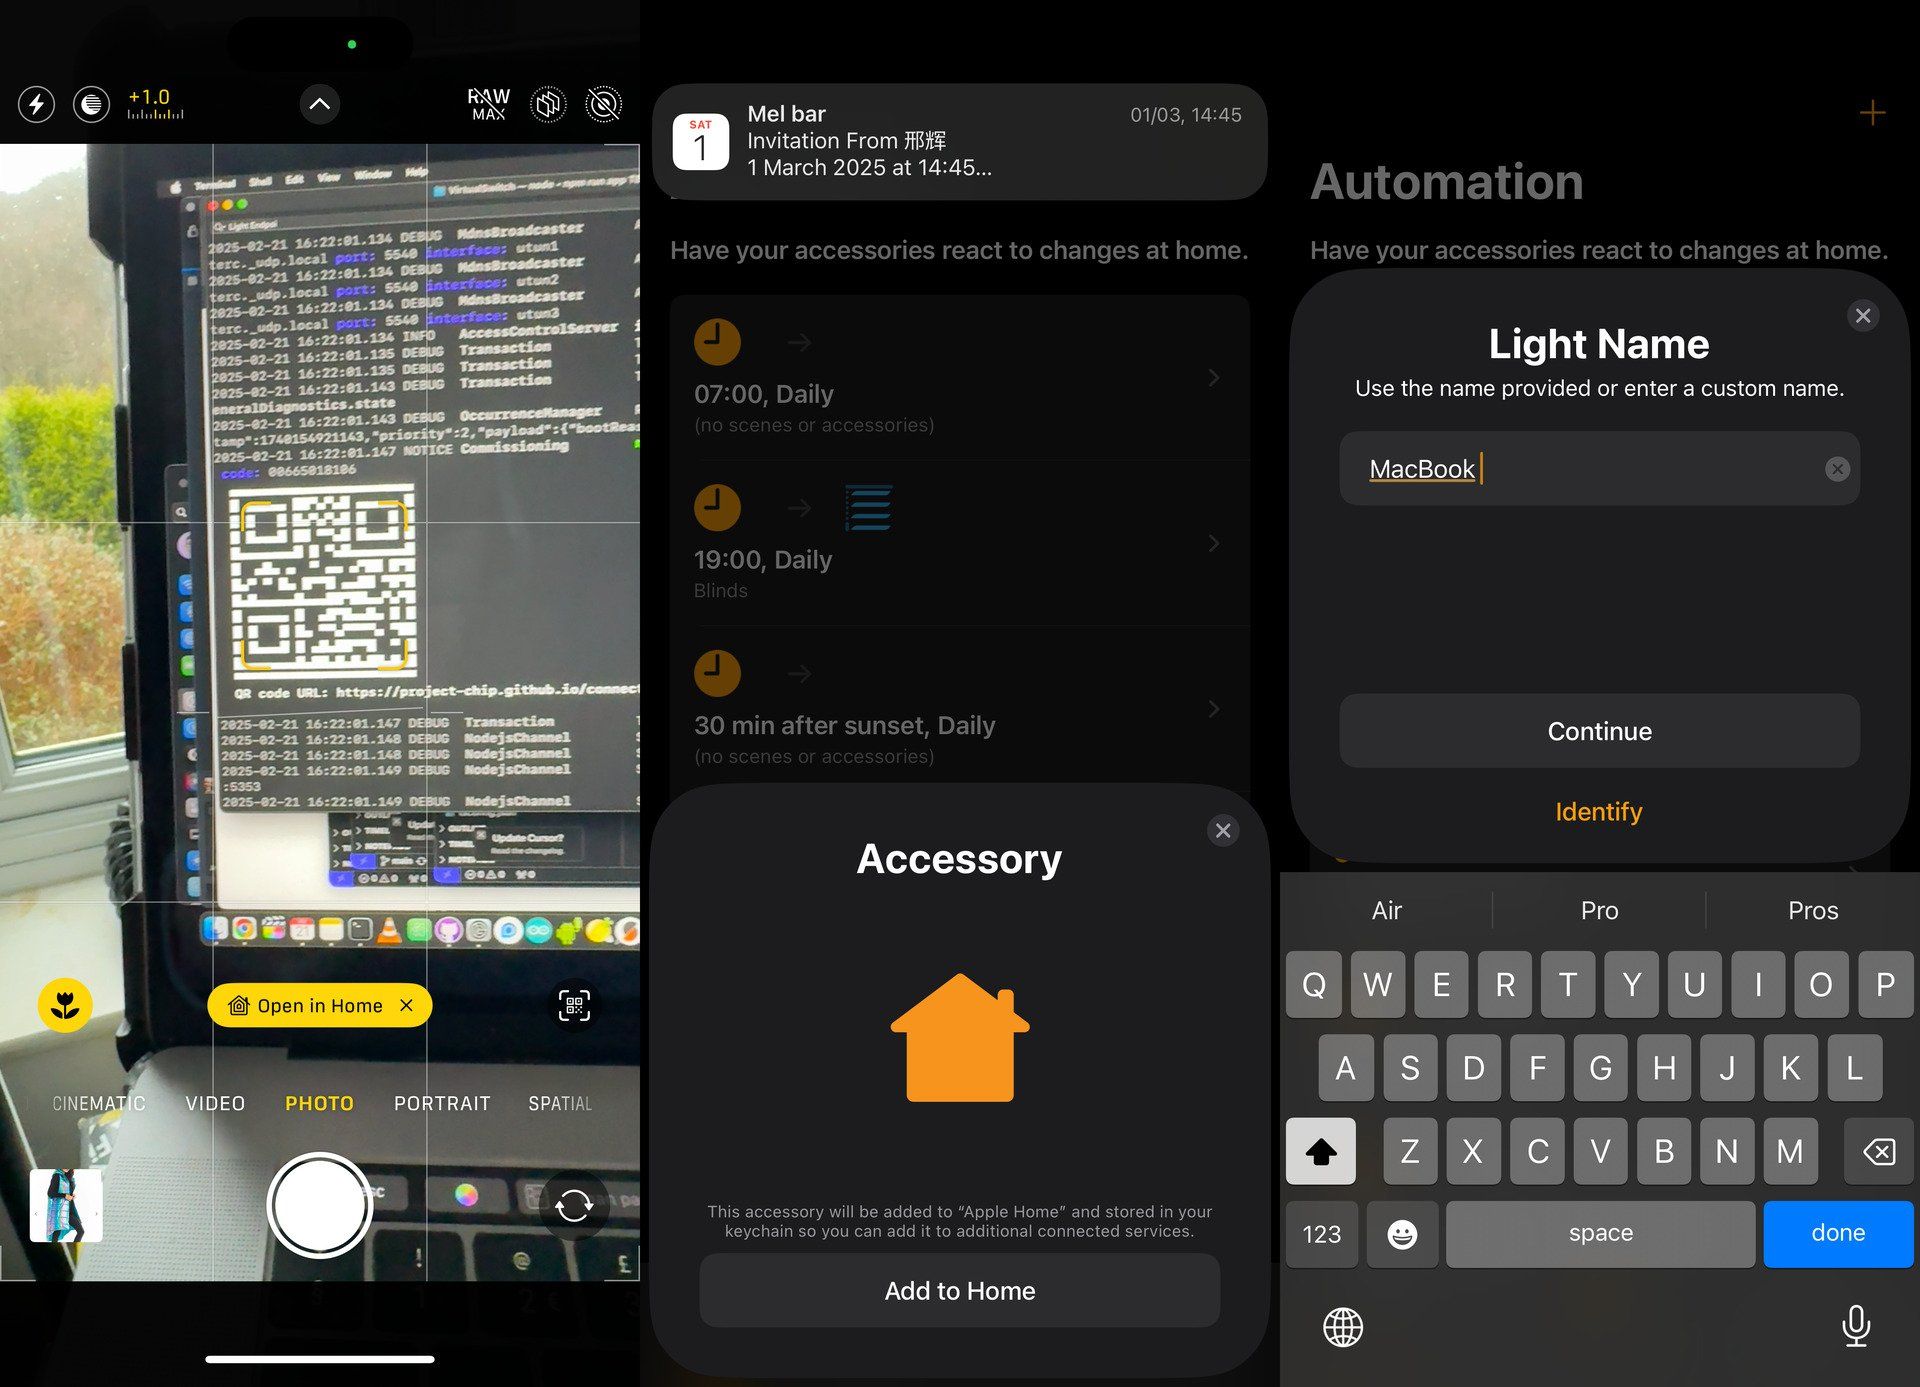
Quick tip: if you're using iOS, just open up the camera app and point it at the QR code. It'll automatically recognize it as a smart home device, so you can tap the action link and add it to Apple Home without going via the usual Home -> Add Accessory -> Scan steps.
If you ever need to wipe the storage and start again with a fresh device, run (making sure you backed up your main code, first):
rm -rf ~/.matter
It's quite verbose, so if everything is working, you should see a ton of debug messages. Now, toggle your virtual device switch on, and you should see something like the following appear in the messages:
2025-02-16 09:53:02.159 DEBUG InteractionServer Received invoke request from udp://[fe80::843:beeb:ac4e:784c%en1]:58884 on session secure/60836 with 1 commands: OnOffLight(0x1)/OnOff(0x6)/on(0x1), suppressResponse=false2025-02-16 09:53:02.159 INFO BehaviorServer Invoke node0.part0.on online#5a49830@4495a69b (no payload)2025-02-16 09:53:02.160 DEBUG Transaction Transaction online#5a49830@4495a69b locked node0.part0.onOff.state2025-02-16 09:53:02.161 DEBUG Transaction Transaction online#5a49830@4495a69b committed and unlocked 1 resourceLight is now true
That means the code is working—receiving commands—and we can adapt it for our needs. Press CTRL-C to stop it.
At this point, you should take a look at the source file, located in src/main.ts. You'll see it's quite barebones, since the Matter.js library handles all the complexities. To create a more complex device, we're going to adapt a simple example. You can install the full set of examples locally if you'd like:
npm install @matter/examples
But for our needs, you can take a look online at the full on/off device code for some ideas. This code is still overkill for our needs though, so my final solution has only borrowed parts of it (you'll find the full code at this Gist link):
The key parts of the code here are:
// Force a state update after connection establishedawait endpoint.set({ onOff: { onOff: true }});
This tells the device to startup in the "on" state. The following code is the meat of the virtual device; the actual command to suspend the machine, depending on which platform we're running this on:
endpoint.events.onOff.onOff$Changed.on(value => { console.log(`Light is now ${value}`); if (!value) { // When turned off console.log(`Suspending now`); const platform = process.platform; const suspendCommand = platform === 'win32' ? 'rundll32.exe powrprof.dll,SetSuspendState 0,1,0' // Windows : platform === 'darwin' ? 'pmset sleepnow' // macOS : 'sudo systemctl suspend'; // Linux try { execSync(suspendCommand); } catch (error) { console.error('Failed to execute suspend command:', error); } }});
/** Defined a shell command from an environment variable and execute it and log the response. *///Taken from deviceNode.ts in the full examplesfunction executeCommand(scriptParamName: string) { const script = Environment.default.vars.string(scriptParamName); if (script === undefined) return undefined; console.log(`${scriptParamName}: ${execSync(script).toString().slice(0, -1)}`);}
Making it launch on startup
Although somewhat outside of the scope of today's tutorial, I wanted to share how I got this to launch automatically at startup, on Mac OS. It runs silently in the background, and I don't need to type anything to run it. Download the file com.matter.onoff.plist from this Gist, and place it into your Library/LaunchAgents directory. You must edit the paths for your own project and Node install. Then when you're done, type the following to load it into the startup:
launchctl load ~/Library/LaunchAgents/com.matter.onoff.plistWhat will you make with Matter.js?
The open-source nature of Matter is what makes projects like Matter.js possible, and that’s a huge win for developers looking to experiment, prototype, or even build real, certified smart home products. While it’s still early days for Matter.js, it’s already powerful enough to simulate devices, create bridges, and integrate with real hardware.
As the ecosystem grows, we might see more platforms officially supporting Matter.js-based virtual devices out of the box. It could even become a go-to tool for developers testing their smart home projects before investing in expensive hardware.
For now, if you’ve followed along and built your own virtual PC suspend switch, you’ve got a solid starting point for diving deeper into Matter.js. Whether you’re automating your home, testing Matter integrations, or just having fun experimenting, the possibilities are vast.
What will you build next?
About the Author

James Bruce
Smart Home Contributor, Videographer, and Developer
James spent seven years in Japan, where he brought technology into the classroom as a teacher and worked part-time as a data centre engineer. Formerly the CTO and Reviews Editor of MakeUseOf, he has also contributed to publications like TrustedReviews, WindowsReport, and MacObserver. With a BSc in Artificial Intelligence, James combines his technical expertise with a passion for writing, programming, and tech reviews. Now based in Cornwall, he enjoys the slower pace of rural life, building LEGO, playing board games, and diving into VR.